Adding a switch to an existing VLAN is also easy with "NETGEAR Insight"
(*This story is fiction. It has nothing to do with real people or organizations other than NETGEAR.)
Slight work to change the network configuration
"I bought a beef bowl." The sales manager puts other lunch boxes on Kentaro's desk.
"Wow, thank you! Itadakimasu!". Kentaro, who was busy and finished his lunch with a single sweet bun, immediately opened the lid of the lunch box and ate the beef bowl.
Today is the day to connect a wireless LAN access point to the smart switch that was introduced the other day and set up a VLAN. During that work, the company network would not be connected, so after consulting with the general manager, we decided to do the work at night after work.
Kentaro finished his lunch in no time while thinking about the work procedure in his head. My stomach was full and I was filled with spirit. "Alright, let's do it." With that, I headed to the corner of the room where the routers and switches were to begin reconfiguring the network.
Why you need to change settings instead of "just connect"
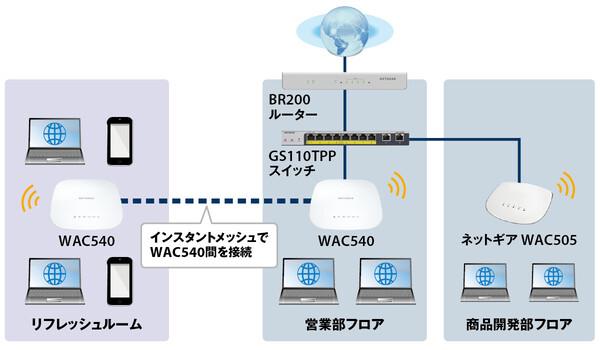
Gochisoo's internal network (Gochisoo network) has a router and three access points managed by "NETGEAR Insight" ( sales department, product development department, employee refreshment space) are connected. And last time, we introduced a new smart switch "GS110TPP" to cope with the future increase in the number of access points. Of course, this switch also supports Insight management.
In this work, remove the cable that connects the router and the access point, and put the GS110TPP between the router and the access point. The switch supports PoE+ power, eliminating the need to connect a power adapter to the access point. It should be easy and convenient to install additional access points.
However, it is not possible to simply disconnect the cable from the router and reconnect it to the switch. The Gochisoo network offers guest Wi-Fi for visitors. To keep this guest Wi-Fi traffic separate from employee traffic, I have already configured VLANs on my access points and routers. Therefore, if you do not set up a VLAN for the switch that goes in between this time, you will not be able to communicate with the guest Wi-Fi *note.
Note: In this network, VLAN ID 1 is set for the employee VLAN, and VLAN ID 100 is set for the guest network. VLAN ID 1 is called the "default VLAN" and is already included in the initial settings of the smart switch, so the employee VLAN can communicate without any settings. On the other hand, communication is not possible unless the guest VLAN (ID 100), which is not included in the initial settings, is set.
Gochiso lunch box network diagram after GS110TPP switch installation
Since this is a good opportunity, I decided to review the device name of the access point managed by Insight. Until now, we simply assigned consecutive numbers such as "GochiAP1" and "GochiAP2", but as the floors expand and the number of access points increases, it becomes difficult to intuitively know which access point is where. . Therefore, the access point name was changed to "GochiAP-Eigyo" for the sales department, "GochiAP-Shohin" for the product development department, and "GochiAP-Refresh" for the refresh room. If you use a name that specifically indicates the installation location, you can immediately find out where it is in the unlikely event that a problem occurs.
Of course, you can easily change the settings from the Insight app on your smartphone. From the Gochisoo network device list, tap the device you want to rename to open the device screen, then tap the pencil icon next to the device name. After changing the name to the new name, wait a little while for the change to be reflected on the Insight cloud side, and check the network device list again.

Enter the device screen from the device list. Click the pencil icon to change the admin name of the device
Easy setting change from the Insight smartphone app
Although the introduction has become long, we will finally set the VLAN on the GS110TPP switch. . The rest of the setup procedure is not much different from setting up a VLAN on a router.
First, launch the Insight app on your smartphone, tap "Location" and select the network location where you want to set the VLAN (in my case, I selected "Gochisoo").
Next, when you tap "Network Settings" in the center of the screen, a screen for selecting the VLAN to be set is displayed (you can also add a new VLAN by tapping the + in the upper right). There are two settings here: "Management Network" for employee VLAN (VLAN ID 1) and "Guest Wi-Fi" for guest VLAN (VLAN ID 100). Since the setting flow is the same, here we will explain the setting method for Management Network.
Open the network location that sets up the VLAN, open the "Network Settings" screen and start setting!
When you tap Management Network on the selection screen, the setting screen for this VLAN (network name, VLAN name, VLAN ID, etc.) is displayed first. You can change the VLAN network name to something that is easy to understand, but this time, do not change it and tap "Next".
Next, a screen called "Wired Settings" will appear. On this screen, configure settings so that each port of the router, switch, and access point can handle VLANs. This can be said to be the “main event” in this setting.
A wired port that handles VLANs must be set to a "trunk port" or "access port". As introduced in the article before last, the trunk port is a mode that can handle multiple VLAN traffic with VLAN ID tags on one physical port. Access ports, on the other hand, have their own VLAN ID and can handle only one VLAN traffic.
In this case, traffic from PCs and smartphones connected to the employee SSID via wireless LAN is tagged with VLAN ID 1, and traffic from terminals connected to the guest SSID is tagged with VLAN ID 100. Internet communication is performed via switches and routers. Therefore, all the ports of each device corresponding to that route should be set as trunk ports.
Since each device and port are displayed on the screen, tap the "trunk port" button at the bottom of the screen, and then tap each port connected by cable to the access point, switch, and router. Just add the letter "T" next to the port number.
First you will see the configuration screen for the VLAN itself, and then the configuration screen for the wired port. Set the port connected to the LAN cable to "trunk port" mode that can handle VLAN
By setting all the wired LAN ports of access points, switches, and routers through which VLAN traffic passes as "trunk ports," you can access the Internet from your guest Wi-Fi.
The next screen is a setting screen for whether or not to allow communication between VLANs. For security reasons, we want to prevent communication between the employee VLAN and the guest VLAN, so turn off this setting and tap "Next".
The last screen is for setting the IP address range and DHCP server used in this VLAN. This time, the previous settings have been taken over, so I tapped "Next" without changing them. This completes the configuration of the employee VLAN.
Similarly, set up a guest VLAN. However, since the settings so far are basically inherited, there should be no problem if you only set the trunk port.
Don't allow communication between employee VLAN and guest VLAN. Also, you can use the IP address range and DHCP server settings as they are.
After setting up, please check whether you can connect the terminal to the employee SSID and the guest SSID and connect to the Internet, and whether access to the employee network from the guest Wi-Fi is properly blocked. Let's check that.
It was an hour after Kentaro finished changing all the settings. He was worried, "What if I set it wrong and it doesn't connect?", but the work went smoothly.
Kentaro decided to write down the network configuration on a drawing so that he would not forget the port where the access point was connected and the settings that were made during this work. Looking over his shoulder at the situation, the general manager said, "It's starting to feel like a network." Kentaro couldn't help but laugh at the exact same impression he had muttered the other day. Kentaro couldn't stop laughing at the manager's quizzical gaze.


![[Osaka Marriott Miyako Hotel] Plenty of cheese! Italian buffet held company release | Nikkan Kogyo Shimbun electronic version](https://website-google-hk.oss-cn-hongkong.aliyuncs.com/drawing/article_results_9/2022/3/28/1061eb31530c979d7b766ae1877b113a_0.jpeg)


